FREE POWER POINT TUTORIALS FOR BEGINNER:
 |
| Microsoft Power Point tutorials |
What is power point ?
This power point tutorials will explain you most of the concept of power point . Power point is a software which provide data and any information with the help of some text , diagram , animation , images , and transitional effects etc in the form of slides. Power point is the most popular presentation software program.
How to save your power point Presentation file?
Power point tutorials ------ how to save your presentation.
It's a great practice to always save your document before you begin to type anything. To begin with this Initially , Just go to File ------ Save as . Now one dialog box will appear where you can specify your filename and the location where you want to save your file. Then click on save button.
After you have saved your blank file , now you can begin your work on that blank presentation file.
When you begin your work then afterwards you can just press ctrl+ S key on your keyboard or go to file --- save , to periodically save your work on it.
 |
| Power point tutorials - Saving your presentation in power point |
 |
| Power point tutorials -Save as window in power point |
RIBBON:
Power point tutorials ------ Ribbon in power point
There are several frequently used tabs File , Home , Insert , Design and view. Clicking on each tabs activate some menus , buttons and commands. There are some tabs that show up only when needed like Text box tools , Picture tools, Drawing tools etc.
 |
Power point tutorials - Ribbon in power point
|
On the Ribbon under the Home tab , contains various icons a text editor , new slide option , cut , copy , paste , Layout icons.
 |
| Power point tutorials - Home Tab in power point |
On the Ribbon under the Insert tab , contains several options for formatting the design and elements of your presentation. These options are New slide , Table , Charts , Word Art , Symbols , Media.
 |
| Power point tutorials -Insert Tab in power point |
On the Ribbon under the View tab , contains several options such as Master views , Presentation views , Rulers , Gridlines , Macros.
 |
| Power point tutorials - View Tab in power point |
HOME TAB:
New slide:
Power point tutorials ------ how to insert New slide in power point
To add a new slide to your presentation Go to Home tab ------ click on new slide option. Click on the drop down arrow to choose the style of your slide.
 |
| Power point tutorials - New Slide insertion in power point |
Slide Layout :
Power point tutorials - Slide layout in power point
To apply slide layout , Go to Home tab ---- click on Layout , to choose your preferred style. This Layout allow you to choose how you want content on your slide to be displayed.
 |
| Power point tutorials - Slide Layout in power point |
INSERT TAB:
Pictures:
Power point tutorials - how to insert pictures in power point
To insert picture into the presentation , Go to Insert tab ---- click on Picture , Now choose the image that you want to put into your presentation , then click on insert.
 |
| Power point tutorials - Inserting Pictures in power point |
Word Art:
Power point tutorials - Inserting word art in power point
To insert Word Art , Go to Insert tab ------ click on Word Art . Then you can choose various effects. Now you will be prompted to insert text.
 |
| Power point tutorials - Inserting Word Art in power point |
Creating Table:
Power point tutorials - Creating table in power point
To create table in your slide Go to Insert Tab ------ Click on Table. Now choose the size of the table by typing in the required number of rows and column then click on ok. The table will be inserted in your slide.
 |
| Power point tutorials - Inserting Table in power point |
Inserting Flowcharts:
Power point tutorials - Inserting flowcharts in power point.
Flowchart is used to create diagrams in Microsoft Power Point. To insert flowcharts in power point, Go to Insert tab ------ click on Smart art. Now a window will appear you will have several option to choose from such as List, Process, Hierarchy, Relationship, Matrix , Pyramid etc . choose any of the option then click on ok.
 |
| Power point tutorials - Inserting Flowcharts in power point |
To insert shapes . Go to Insert Tab ------ Click on Shape. Then you can click any of the given shape and drag it on your slide.
 |
| Power point tutorials - Adding Shape in power point |
DESIGN TAB:
Power point tutorials - Design Tab in power point
The default slide design for Microsoft office Power Point is blank slide. If you want to add some specific design to your slide then you must add one. To do this Go to Design Tab , then select any of the theme for your presentation it will automatically apply to your slide.
 |
| Power point tutorials - Design Tab in power point |
TRANSITIONS TAB:
Adding transitions between slide:
Power point tutorials - Adding transitions in power point
To add transitions to your slide , click on Transition Tab. You are then given a variety of transition options like Push, cover , fade , flash etc. When you select the transition it will show a preview on the existing slide. You must have a text or image within the slide to see a preview.
 |
| Power point tutorials - Transition Tab in power point |
Durations:
Under transition tab , On the right side of the various transitions effects, there is a option of durations, this allow you to modify the duration of the transitions that is present on the particular slide. There is also the option of sound and there is also a option of whether or not to change to the next slide by " On mouse click".
 |
| Power point tutorials - Durations |
ANIMATIONS TAB:
Adding Animations to Objects:
Power point tutorials - Adding animation in power point
To add an animation to an object , Select the Animation Tab. You are given variety of animation options like Appear, Fade , Fly in , Wipe , Appear etc. When you select an animation it will show a preview on the existing slide. You must have a text or image within the slide to see a preview.
Just choose any of these animation effects,
 |
| Power point tutorials - Animation Tab in power point |
SLIDESHOW TAB:
Power point tutorials - Slideshow tab in power point
To access slideshow , Go to Slideshow Tab . The purpose of slideshow is to let the presenter have an easy access to the full screen presentation mode as well as Rehearse Timings and Record Slideshow .
 |
| Power point tutorials - Slideshow Tab in power point |
Rehearse Timings:
Rehearse timings allow us to set up our presentation to play at a certain speed without having to click through the slide yourself. This feature allow us to save timings for each slide and transitions and will start the power point automatically.
Once you click on Rehearse timings option timing will immediately begins. To stop the timings simply click on the pause button located at the top left.
 |
| Power point tutorials - Rehearse Timings in power point |
Record Slideshow:
Power point tutorials - Recording slideshow in power point
Record slideshow is very similar to the Rehearse Timing. The only difference is that here we can have the option to start recording at any given slide , rather than the beginning .
 |
| Power point tutorials - Record Slideshow in power point |
REVIEW TAB:
Spell Check:
Power point tutorials - Spell check in power point
Under the Review Tab you will find a ABC spelling to the extreme left side. ABC spelling will find the spelling error that are within your presentation . Make sure you are o your first slide to get an accurate result.
 |
| Power point tutorials - ABC Spelling in power point |
VIEW TAB:
Power point tutorials - View tab in power point
The view Tab contain different tools to allow you to view your presentation .
 |
| Power point tutorials - View Tab in power point |
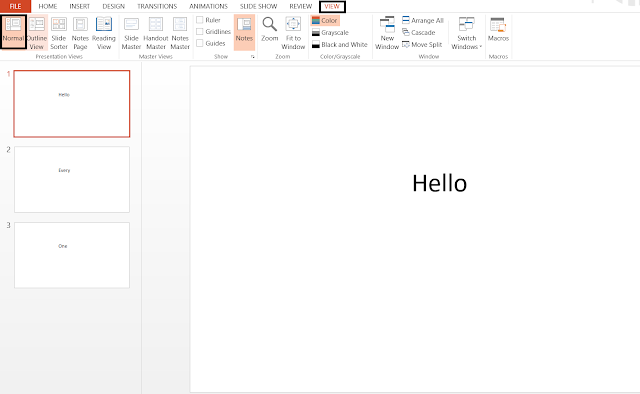
Normal View :
Power point tutorials - Normal view in power point
It is the ordinary view that allow you to see and create your presentation slide.
 |
| Power point tutorials - Normal View in power point |
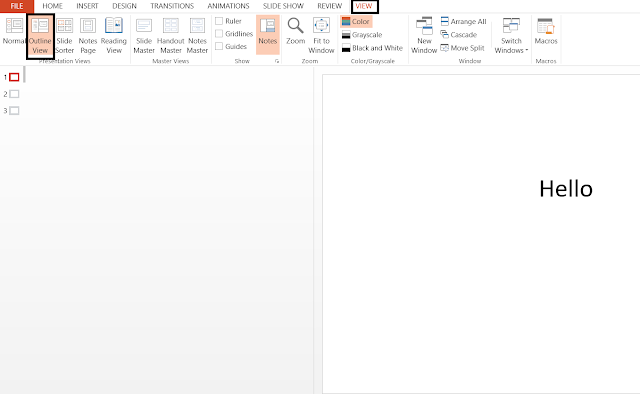
Outline View:
Power point tutorials - Outline view in power point
This view allow us to change the order of the slides in which they appear. To do this just click the desired slide on left and drag it. One you start dragging a grey line will appear. You can drag the slide up or down .
 |
| Power point tutorials - Outline View in power point |
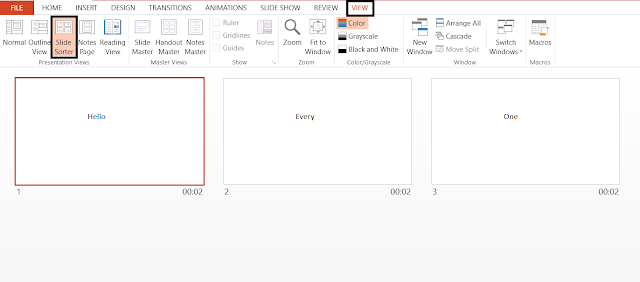
Slide sorter view:
Power point tutorials - slide sorter view in power point
This view allow you to see a thumbnail view of your slide in a horizontal view. This view allow you to make easy changes to several slide at once. If you had recorded timings for your slide then this slide sorter view will also show the recorded times below that particular slide.
 |
| Power point tutorials - Slide Sorter View in power point |
Notes Page View :
Power point tutorials - Notes page view in power point
Notes View allow you to add notes to any particular slide you want. Just click on Notes page under the View Tab then a text box will appear with a slide number that has been selected. Type your note then go back to normal view there you can see your notes located under slide slide preview.
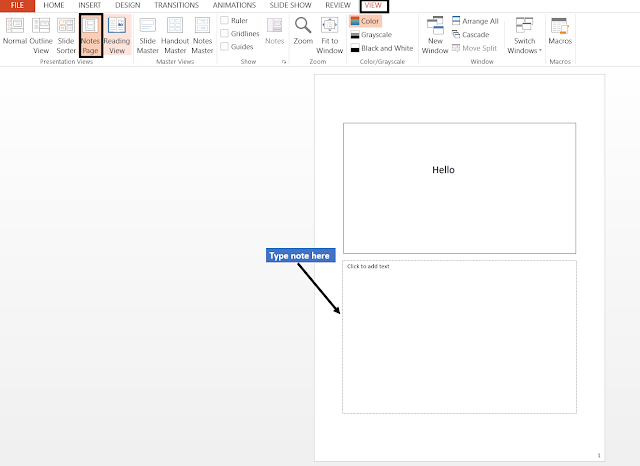 |
| Power point tutorials - Note Page View in power point |
Reading View:
Power point tutorials - Reading view in power point
This view Play your Slide Show in the power point window to see animations and transitions without switching to a full screen slideshow.
 |
| Power point tutorials - Reading View in power point |
Slide Mater View :
Power point tutorials - slide master view in power point
Slide master view is a place where all all the information such as background, color , theme are sorted . Every power point has at least one slide master. One you click on slide master view you will get different type of layout to choose from.
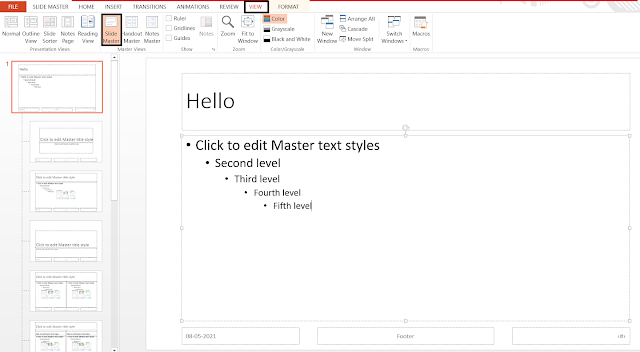 |
| Power point tutorials - Slide Master View in power point |
Handout Master :
Power point tutorials - Handout master view in power point
This view customize how your presentation will look as printed layout. You can choose the design and layout of the handouts such as background formatting , and where header footer will appear.
 |
| Power point tutorials - Handout Master in power point |
Notes Master :
Power point tutorials - Notes master in power point
This view customize how your presentation will look when printed out with notes. You can choose the design and layout of the notes page such as background formatting , and where header footer will appear .
 |
| Power point tutorials - Notes Master in power point |
HOW TO PRINT DOCUMENT:
Power point tutorials - Printing document in power point
Always first save your document before you print. To Print your document Go to File ------ Print , select the desired settings and then click print again.
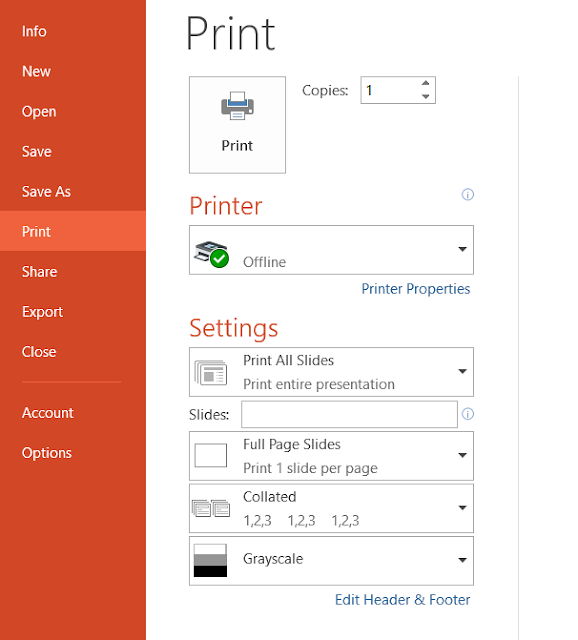 |
| Power point tutorials - Printing Document in power point |
SOME SHORTCUT KEY FOR MICROSOFT OFFICE :
Power point tutorials - Shortcut keys
 |
| Power point tutorials - Keyboard Shortcut Key |
Bold Ctrl + B
Copy Ctrl + C
Close Ctrl + W
Cut Ctrl + X
Find Ctrl + F
Paste Ctrl + V
Print Ctrl + P
Save Ctrl + S
Select all Ctrl + A
Slideshow begin F5
Slideshow end Esc
Spelling check F7
New slide Ctrl + M
New window Ctrl + N


Comments
Post a Comment